Installation
API Craft ships as two pieces. They are independent; install one or both.
- The desktop app (
apicraft): the graphical IDE. - The CLI (
craftr): the command-line interface, distributed on npm.
Both run the same core against the same project files, so they interoperate freely.
Desktop app
Grab the latest build from the download page, or follow the steps for your platform.
Linux
curl -fsSL https://releases.api-craft.dev/stable/install.sh | bash
The script installs the desktop app only, and does three things:
- Downloads the AppImage (around 130 MB) to
~/.local/share/api-craft/. - Creates the
apicraftcommand in~/.local/bin/. - Asks the app to add itself to your applications menu, icon included.
Launch it from the menu afterwards, or run apicraft. There is nothing to configure: the
app keeps itself up to date from then on.
Rather read it first? It's a short shell script, so you don't have to pipe it into a shell:
curl -fsSL -o install.sh https://releases.api-craft.dev/stable/install.sh
less install.sh
bash install.sh
Only x86_64 is built today. On arm64 the script stops and says so.
AppImages need FUSE. Ubuntu 22.04 and later no longer ship libfuse2, which every
AppImage needs in order to run. If apicraft exits with a FUSE error, install it once:
sudo apt install libfuse2
macOS
Download the .dmg from the download page and drag API Craft to Applications.
That's the whole install: Launchpad, Spotlight and open -a "API Craft" pick it up from there.
No script, because the .dmg already does the job.
A native Windows build isn't available yet. In the meantime the CLI runs on Windows (it's a normal npm package); see below.
Every build also lives on the download page as a plain file, if you'd rather skip
the script. A hand-downloaded AppImage adds itself to the applications menu the first time you
launch it; you just won't get the apicraft command unless you link it yourself. The app is
fully local either way: it does not require an account or a network connection to use.
Updates
The desktop app updates itself. It checks on launch, and Settings → Updates has a Check for updates now button for when you don't want to wait.
The same tab picks the update channel:
- Stable: tested releases only. The default.
- Beta: early builds, and every stable release. Beta is a superset of stable, not a parallel track: you never miss a stable version by being on it.
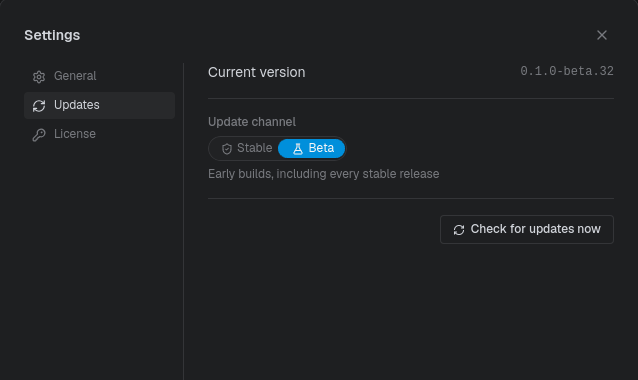
Switching takes effect at the next check. The choice is stored with the app's own settings, not in any project, so it follows the machine rather than the repository.
On Linux you can also start out on beta, by installing from the beta script instead:
curl -fsSL https://releases.api-craft.dev/beta/install.sh | bash
It is the same installer against the beta channel. Installing stable and flipping the switch in Settings gets you to the same place at the next check.
The CLI has the same two channels through npm's dist-tags:
npm install -g @apicrafthq/cli          # stable
npm install -g @apicrafthq/cli@beta     # beta
CLI
Install the CLI from npm, globally:
npm install -g @apicrafthq/cli
Or run it without installing:
npx @apicrafthq/cli --version
No Node on the machine? The download page will also serve standalone craftr
binaries for Linux and macOS (x64 and arm64); drop one on your PATH and it runs on its own.
Verify the install:
craftr --version
The CLI binary is craftr. (apicraft is the desktop app.) Throughout these docs, every
command-line example uses craftr.
Tab completion
craftr ships shell completion for bash, zsh and fish. Install it once:
craftr completion install
It picks the shell from $SHELL; pass --shell to choose another. Open a new shell
afterwards, or re-source your rc file, and completion is live.
What it completes is read from the project you are standing in, not from a static list, so it knows your own API slugs, environment names, resource slugs, request references, workflow names, and the operation ids waiting to be mapped:
craftr req run Pet/<TAB>          # request instances under the Pet resource
craftr env read <TAB>             # dev, staging, prod, prod-eu, prod-eu-client-a
craftr workflow run <TAB>         # workflow names
craftr workflow run pets --env <TAB>   # <api>=<env> bindings the batch needs
Where it lands:
| Shell | Script | Sourced from |
|---|---|---|
| bash | ~/.config/craftr/completion.bash | a marked block appended to ~/.bashrc |
| zsh | ~/.config/craftr/completion.zsh | a marked block appended to ~/.zshrc |
| fish | ~/.config/fish/completions/craftr.fish | nothing, fish autoloads it |
The rc block is delimited by # ###-begin-craftr-completion-### markers, so re-running the
install replaces it rather than stacking copies. To remove both the script and the block:
craftr completion uninstall
Uninstall
Nothing you remove here touches your projects. They are plain files in your own repositories, and API Craft never stores anything about them outside the project folder.
On Linux, where the script put things:
apicraft --uninstall-desktop-entry                     # menu entry and icons
rm -rf ~/.local/share/api-craft ~/.local/bin/apicraft  # the app and the command
On macOS, drag API Craft from Applications to the Bin.
Either way, the app's settings (your update channel, your preferences) outlive the app itself, and so does your Pro license. Remove them too if you mean it:
rm -rf ~/.local/share/com.api-craft.desktop              # settings, Linux
rm -rf ~/Library/Application\ Support/com.api-craft.desktop   # settings, macOS
rm -f  ~/.config/api-craft/license.key                   # license
The CLI is an npm package:
craftr completion uninstall     # if you installed shell completion
npm uninstall -g @apicrafthq/cli
Next
Head to the quick start to create a project, import a spec, and run your first request.